Showing posts with label LinkRez. Show all posts

Saturday, October 20, 2007

LinkRez-assisted creations

Here are some pictures of items whose creation was assisted by the LinkRez necklace chain-generating tool. Some pieces are composed of prims placed primarily by LinkRez; in others, LinkRez only plays a small role.

As you can see, the artistry and talent is often in the design and creation of the ornamental centerpieces or construction of the links themselves. LinkRez merely assists in placement of links, freeing up the jeweler's time for more creative endeavors.

From Virrginia Tombola:


From CrisAlex Sands:


Tuesday, September 25, 2007

LinkRez v1.02 minor update released

A minor bug fix to LinkRez was released today, to version 1.02. It addresses the problem of incorrect placement of multi-link prims, when the geometric center is different from the root prim center.

If you previously purchased LinkRez, you should have automatically received the update from the update server. However, if you were set to "Busy," the update might not have been delivered. Just let me know, and I can check the sales records and send it again.

Note that this is for LinkRez, the necklace chain link generator, NOT LoopRez, the skirt generator.

Monday, September 10, 2007

I'm not dead yet!

Way back on June 29th, I reported on a problem with LinkRez using custom links that had multiple prims, where the geometric center was different from the root prim center, and that a bug fix was imminent.

I fixed the bug, but never released the fixed version, and I really, REALLY should.

What happened was that the fix was easy, but then I tried to implement some difficult changes someone suggested, and never completed that. Real life intervened, and then I just never got around to it (and nobody complained about the problem, so it didn't seem many people were using multi-prim links). As time passes, it becomes much, MUCH harder to go back to a script, because you become less familiar with it, and have to "re-figure everything out." So, the activation energy to get the bugfix released just got worse and worse.

So, LinkRez was left in a half completed state in "the workshop".

What I'll need to do now, is just forget about implementing the suggestions, and get the fix out. My time in SL is getting less and less, for various reasons, but I still owe it to everyone who has purchased LinkRez, to make sure their purchase is fully functioning.

In the meantime, if you're affected by this bug, please contact me, and I'll expedite getting the fix to you.

Saturday, June 30, 2007

Disillusionment

"This Is a terrible invention, it ruins all the hardwork people had to go through to make our necklaces" - Sinjo Drakes, regarding LinkRez

"As are all my items - these are 100% Hand placed prims - No Prim bot link rez generators used." - Mhaijik Guillaume, posted the same day LinkRez was released

Sometimes, the closed-mindedness of people just drives me to despair. People who seem to lack vision or appreciation of progress. Or, the hard work it takes to make progress.

I wonder if these people in the 1400's would have railed against Gutenberg as well? Granted, it's an imperfect analogy, but, like LinkRez, a printing press is only a tool. For beautiful lettering, it still requires that the movable type be envisioned, crafted, and carved. It still requires that somebody with literary ability create the content of what is printed. It allows ease of production far beyond what could be done by scribes laboriously copying pages by hand. And, like LinkRez, absolute crap can still be produced when the user lacks talent.

When I first announced I was working on LinkRez, one of my first comments started out "First off -- this really is NOT a Necklace Generator," to recognize that a mere tool did not make a user into a creator. Creativity, skill, and artistic vision will always be the most important aspects in content creation, not the possession or use of the tools.

Still, it's hard not to be disillusioned and discouraged by some people.

Friday, June 29, 2007

LinkRez bug -- multi-prims and geometric centers

Thanks to a user report, I'm aware of a major bug in LinkRez, but a fix is done, and I'm just trying to do a few other tweaks, and give other users a chance to find more bugs, before releasing it.

Basically, it turns out that:
  • llSensor() returns the position of the ROOT prim (used in the sizing board)
  • llGetPosition() returns the position of the ROOT prim
  • llRezObject() rezzes to place the position of the GEOMETRIC center of all prims in a linkset
This doesn't cause a problem if links are SINGLE prims. And it doesn't cause a problem if a necklace chain link is made up of multiple prims, but the root prim is near the 'center' of the linkset.

But, if you use a multiple prim chain link, and the root prim happens to be 'off center', LinkRez will rez the prim 'shifted over' a little bit. Not acceptable. It wasn't caught earlier, because all my test links are either single prims, or linksets where I happened to choose a 'center' prim as the root prim.

Anyhow, the fix was trivial, which was to replace all instances of llRezObject() with llRezAtRoot(), which is based on the root prim position of the object being rezzed, rather than the geometric center.

I wanted to make a few other minor tweaks, so I'll hold off on sending out an update.

This is also a good chance for users to suggest any other (minor) enhancements they'd like to see.

Thursday, June 28, 2007

LinkRez Reviews and Comments

LinkRez Reviews and Comments

  • Just working through the LinkRez Tutorial. Boy, am I impressed! Not only is the jewelry great, but the programming level is fantastic. I didn't know your could do such things in LSL. I have some similar operations I'd like to do, and knowing that it's possible will be an inspiration. - WJ

  • Hey! I just wanted to IM you and THANK you for making such a fun and amazing tool! this LinkRez is a blast to use, super easy and I can't believe the fun I'm havin just playing with it! WHOOT! - BM

  • omg! is seems like all i dreamed about! :) the creator is a magican... the most usefull tool i ever bought - DY

  • just wanted to say i think your link rez program for making necklaces is one of the best programs i have tried yet in sl - SV

  • Great product. ... I am afraid to even think what a math mind like yours looks like inside ..so I will just say ... GREAT JOB !!! - A

  • I have bought alot of things around SL that either didn't work straight out of the box, broke shortly after starting to use, or was just flat out poor quality, but the LinkRez has NONE of these issues! It not only does what it says it does, it couldn't produce better results in my opinion! It is super easy to use, and I had created 3 necklaces that were better quality than anything else I had ever made within 1 hour!
    Instructions are pretty straight forward and easy to follow. So long as you read them, you should have no problem getting beautiful, stunning results!
    A+ Product! - SL

  • I am an owner of your linkrez. AWSOME piece of equipment -RL

  • the price is great, I started playing with this already...got so excited I tp'd right to your store and forgot I was half dressed and had prims sticking out all over me (work related I assure you)So far I love it thank you thank you! - PP

  • I've been working with Link Rez and Ged, you knows I love it! - EN

  • It's something unbelievable! -T

  • This is so wicked cool! Good stuff! - RC


(If anybody does NOT want me to share their comments with others, let me know, and I'll happily remove it.)

Tuesday, June 26, 2007

LinkRez v1.01, minor update

I released a minor update to LinkRez. If you purchased LinkRez v1.0 and did not automatically receive the update, please contact me.

Changes:
  • added a new sizing board option, for "edge placement" of necklace links
  • added a dialog menu to more conveniently choose notecards (thanks to Justa Meness for suggesting this!)
  • pose-stand rezzing bugfix
  • renamed the components inside LinkRez that users should NOT be changing with a "zzz-" prefix
The LinkRez Tutorial Part II, lesson additions 6b and 8b, describes these changes.

Also, I've made LinkRez available at SL Exchange.

Friday, June 8, 2007

LinkRez v1.0... released...


I've released LinkRez v1.0, available at ScriptThingies Linji (151, 230, 67) -- I hope you all like it! I guess we can call this the grand opening of the store, too.

If you don't know what LinkRez is, it's a necklace chainlink generator -- check out this link for lots of information. Then, stop by the store and try out the LinkRez DEMO, which lets you see some the tool in action.

If you buy LinkRez, be sure to pick up the L$1 purple "LinkRez Tool Box #1", which contains a bunch of practice micro-links, already sized, as well as LinkRez program notecards, to get you started more quickly.

Join the open membership "Script Thingies" group, for announcements and user-to-user product support.

And finally, keep an eye out for a "L$500 rebate program" for LinkRez purchasers, who are willing to share an interesting prim or linkset.

Phew, I'm tired... But it's a good tired. LinkRez is finally out!

Wednesday, June 6, 2007

A real-time demo kiosk for LinkRez


Getting very close to a release! One thing I wanted to do before releasing LinkRez was to have a display model that people could click on to actually see the tool in action, in real-time.

It took me a few days, but I wrote a little dialog-driven "control" script, to allow users to choose one of nine or so necklace programs for the LinkRez Demo to run, to generate necklace chains. Please go on over to Script Thingies, Linji (151, 230, 67), and try it out!

One note though -- because it is actually DOING all the calculations to create the necklaces (not just rezzing previously generated necklaces), while running, it's probably inflicting some serious load onto the Sim. Because of that, I prevent it from rezzing a second necklace until the first one (they're temp-on-rez) has disappeared. So, it could take from 30 seconds to a minute, before you can try out a second necklace.


Lastly, I've created a new group -- "Script Thingies." Because we're limited to a maximum of 25 groups, it doesn't make sense to create a new group for each product. Instead, I plan to make all scripting product announcements to this new group. If you're a member of the LoopRez Users group, please feel free to quit that group, and join Script Thingies instead.

Monday, June 4, 2007

a quick necklace

Some of the testers have been reluctant to try out the LinkRez notecard programs, but I'd really like to encourage users to realize that they're really quite flexible, and not that hard to write.

Here's an example of a necklace that took me maybe 40 minutes to create, almost from scratch. There are some imperfections with the sizing / spacing, but those are all fixable within the notecard program (I was just too lazy to do it right). And afterwards, I was able to custom-fit them to three different avatars, within a few minutes.


The centerpiece was made separately, by using the BRACELET setting to rez the sapphires in a simple circle. I then linked the ring of sapphires with a large diamond, and made that a separate link, called "diamondcenter."

The notecard program looks like this:
ODDLINKS
LINKTYPE FLAT

LINK diamondcenter~13.5~<180,>~<-0.00003, 0.00011, 0.03778>
LINK diamond 1.9mm~1.861572~<180,>~<-0.00002, -0.00005, 0.00946>
LINK diamond 5.7mm~5.699158~<180,>~<0.00001,>
LINK round sapphire~1.861572~<180,>~<-0.00002, -0.00005, 0.00946>
LINK diamond 5.7mm~5.699158~<180,>~<0.00001,>

REPEATUNTIL 80
LINK round sapphire~1.861572~<180,>~<-0.00002, -0.00005, 0.00946>
LINK diamond 1.9mm~1.861572~<180,>~<-0.00002, -0.00005, 0.00946>
ENDREPEAT

LINK silver tube~6.164551

Translated, line-by-line, the notecard program reads:
  • use an odd number of links, so that the center piece will be centered
  • rez the center piece, then a 1.9 mm diamond, then a 5.7 mm diamond, then a sapphire, then another 5.7 mm diamond
  • then, repeat the following, until we're almost at the side of the necklace, 80 degrees from the front
    • sapphire
    • 1.9 mm diamond
  • then, rez a silver tube
  • since we're now at the end of the notecard, just finish up the necklace using the silver tube
The gap between the centerpiece and the next small gem could be fixed by editing the "size" of the "diamondcenter," probably from 13.5 down to 13 mm would work well.

But the point of this exercise wasn't to generate a perfected necklace, but just to illustrate that it took less than an hour of time to generate a fairly decent necklace. And that once generated, it could be resized to custom-fit most any avatar.

Wednesday, May 30, 2007

LinkRez Tutorial, Part 2

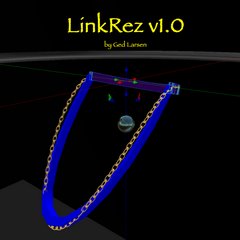
LinkRez Tutorial, part II

Welcome to the LinkRez tutorial, part II. It is designed to be a step-by-step introduction to all the features of the LinkRez necklace chain generator, from basic to advanced. If any part of it seems unclear or confusing, or you think that an additional screenshot would help, please post a comment so that I can improve the documentation.

Part I of the tutorial covered necklace sizing and shaping, which allowed you to "fit" a necklace precisely to any avatar.

Part II will discuss custom links and notecard programs, which will allow you to create necklaces using your own links, arranged in any number or order, with as many different types of link placement as you wish.


Lesson 6: Custom links, the Sizing Board, and the LINK command

Using the LinkRez Sizing Board properly is absolutely critical to properly place links, especially when using weirdly shaped, twisted, tortured, and rotated prims. When the SizingBoard is used properly, it allows LinkRez to place links with precision better than 0.1 millimeters.

The sizing board determines the:
  • "flat" orientation of the link, to allow proper rotation
  • "center" location of the link, around which rotations occur
  • length of the link, so that links can be placed without overlap or gaps

  • sizing board calculations are spoken to chat, to be:
    • used in the "LINK" command, to generate an entire necklace using that link, OR
    • copied and pasted into a notecard for future use

  • it is very helpful to store this information in the description field of your link object
    • that way, when you want to use that link again, you won't have to repeat the "sizing board" steps
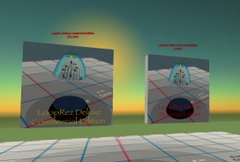
    • in the Script Thingies store (Linji), there will be at least one L$1 "LinkRez Tool Box" which contains links which have been properly "sized," and sizing information saved in the description field. However, you WILL want to learn how to size your own links.

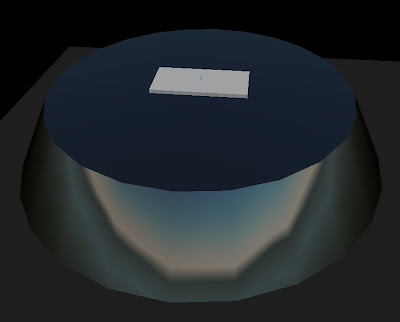
LinkRez Pose Stand and Sizing Board


Here's how to use the sizing board:

1) First, create or acquire a link that you would like to use.

2) the LinkRez sizing board should be on top of the LinkRez pose stand
  • if you don't have a sizing board, "TOUCH" the pose stand
  • if you don't have a pose stand, "TOUCH" the LinkRez Object
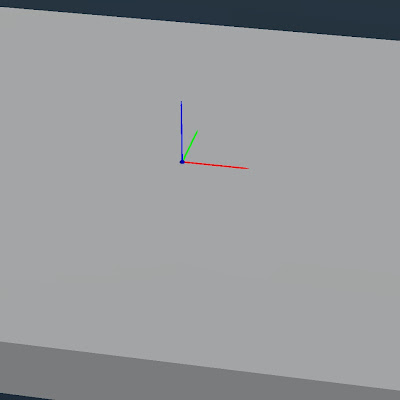
  • the sizing board will automatically rotate itself to ZERO_ROTATION, so that the world's axes lines up perfectly with the sizing board's axes

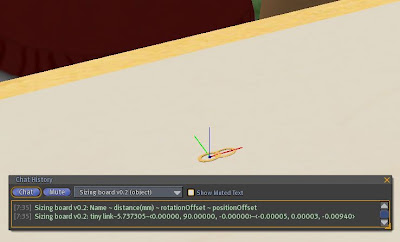
3) the LinkRez sizing board has 3 tiny "toothpicks" sticking out of an even tinier blue dot
  • the blue dot is the PRECISE center point
  • the 3 toothpicks are colored and oriented to match the world coordinate axes
  • the goals are to place your link:
    • perfectly flat on the sizing board, in the "red-green" plane,
    • perfectly centered with the blue dot, and
    • perfectly aligned in the link's "forward" direction along the red toothpick (X-axis)
the three "toothpick" axes of the Sizing Board


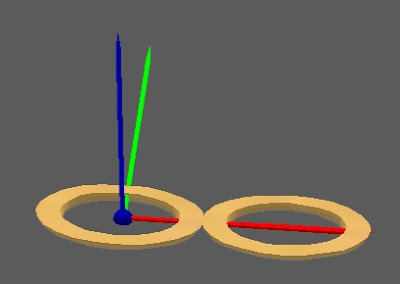
4) rez your link on the sizing board, and rotate it so that it is lying perfectly flat against the grey sizing board


5) position the link so that it is perfectly centered on the blue dot with the red, green, and blue toothpick axes
  • this defines where the CENTER of the link is, where rotations will act
  • position offset is a vector offset (in meters)
  • the blue dot must be at the center; for TALLER links, half your link's height should be UNDER the surface of the grey slab
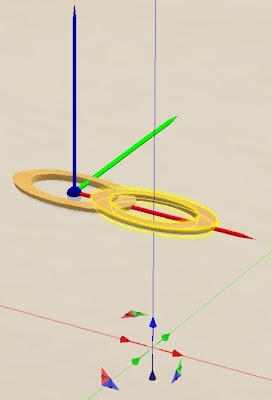
(for this link, notice that the blue dot is in the precise center, and that ALL 3 toothpicks pierce the link in the center positions as well)


6) SHIFT-CLICK-DRAG on the RED axis arrow head to create a copy of the link, and move it PRECISELY down the RED toothpick axis until the 2 links are JUST touching (or overlapping, if you want interdigitated links)
  • this defines the LENGTH of the link, so LinkRez will know how apart the links need to be separated
  • length is reported in MILLIMETERS (not meters), so that you can more easily edit it by hand in notecard programs
  • do NOT rotate your copied link

(in this case, because I want the links to "overlap" as a chain link, I've dragged the copy so that it still overlaps. Normally, you'd want to drag it so that the links were just barely touching)


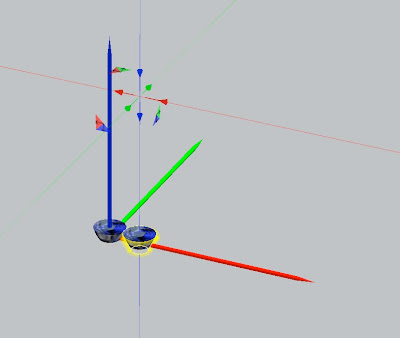
(here's an example of tiny 1.8 millimeter link; it's positioned to be just a little bit "up" on the blue axis, to have the gems protrude outwards a little bit on a necklace, and just touching, so they will be size to not overlap and not have gaps)


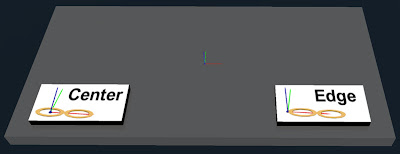
7) TOUCH the sizing board button labeled "CENTER", and it will detect the pair of links, and CHAT the length and offsets. For this lesson, DO NOT use the button labeled "EDGE" -- the use of that button will be described in Lesson 6b.

  • go into your chat history and copy the line NAME~LENGTH~rotOffset~posOffset
  • I'd recommend immediately pasting this into the description field of your link, so that you'll always have easy access to the information
  • note that to use this information for LinkRez, it will need to be preceeded with the word "LINK", either in chat commands or notecard programs

(in the chat history, you would want to copy and save that second line, with all the scary numbers, starting from the word "tiny link")


OK, enough of the tedious stuff. Now, you are FINALLY ready to USE your fancy link to create a necklace! Up till now, you've been using the "/1 TEST" command, which uses an included Temp-On-Rez prim, with the Sizing board calculations already known to LinkRez.


Using the LINK command to specify the LINK you want to use


First, LinkRez needs to be able to access your newly sized link, so drag a copy of your link from your inventory and into the LinkRez Object contents (the transparent disk, which also contains a number of other items, including the LinkRez script, LinkRezRoot, LinkRezStand, and LinkRezTestLink).


Copy the Sizing Board information out of the Description field (you did save it there, right?), and issue the appropriate "/1 LINK" command.

From the example above, it would look something like:
  • /1 LINK tiny link~5.737305~<0.00000,>~<-0.00005, 0.00003, -0.00940>
  • obviously, you would want to be using copy and paste...
LinkRez should start rezzing a new necklace, using your new link! Congratulations! (If the links looks totally weirdly rotated with unsightly gaps, it's because the Sizing Board was not used properly. Time to try again, and make sure it was centered with ALL three toothpicks...)

Now would be a good time to build up a nice collection of saved links, each with Sizing Board information in the Description fields.

Practice sizing links, making necklaces / bracelets / rings made up of single types of links. And, when you have a couple of links ready, you can go on ahead to the next lesson, where you'll use a notecard program to generate necklaces with MULTIPLE types of links!


Lesson 6b: Sizing Board: "CENTER" and "EDGE" options (new to LinkRez v1.01)

In the above lesson, you were asked to align the link so that it was perfectly centered with the blue dot, as above, and then to touch the button labeled CENTER, and NOT the button labeled EDGE.


(proper alignment for using the CENTER sizing board button)

Although this works well for the majority of links, sometimes it can be difficult to precisely "eyeball" the blue dot to be in the precise center. For that reason, another Sizing Board option is available, using the "EDGE" button. Both the "CENTER" and "EDGE" alignment methods, if used properly, will yield the exact same results, but sometimes one method will be easier than the other.


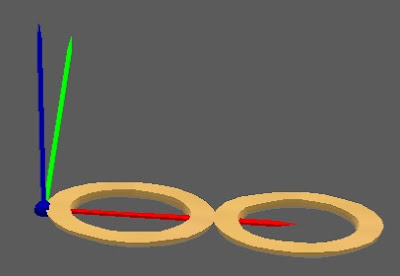
(proper alignment for using the EDGE sizing board button)

With this link, if you wanted to use the "EDGE" method, just like before, you would still:
  • rez and rotate the link so that it is lying perfectly flat against the grey sizing board
  • the red toothpick axis would still point "forward" down the necklace link
  • BUT, this time, instead of "centering" the blue dot / toothpick, you would line up the EDGE of the link with the blue toothpick
  • same as before, you would then shift-drag down the red axis so that the links were perfectly touching
  • finally, you would "touch" the EDGE button, instead of the CENTER button
As mentioned, either method, if used properly, will yield identical results. With experience, you'll find which method is more easy to use with specific links.


Lesson 7: necklaces with different links: using notecard programs

The "/1 TEMP" and "/1 LINK" commands create necklaces that use only one type of link, repeated through the necklace. These necklaces also have only one LINKTYPE and LINKANGLE.

But using LinkRez Notecard Programs, you can create necklaces with as many different types of LINKs, LINKTYPEs, and LINKANGLEs as you wish. Furthermore, you can load in previously saved necklace sizes and parameters. It makes for a very powerful tool to make very complex necklaces.

LinkRez Notecard Programs are actually very simple. Let's start with the basics:
  • notecard programs are put into the LinkRez clear disk contents, the same as the links
  • "/1 RUN name" will run the notecard program called "name"
  • the notecard will contain one command per line
  • all relevant chat commands are supported
  • the necklace will be rezzed from the front, when a LINK command (just like the chat command) is encountered
  • each LINK command will rez only one link (instead of an entire necklace)
  • when the end of the notecard is reached, the last LINK rezzed will be used to complete the necklace

Here's an example of the simplest possible notecard program, containing only a single line:
  • LINK tiny link~5.737305~<0.0,>~<-0.00005, 0.00003, -0.00940>
  • this notecard program would be the equivalent of chatting that LINK command

Here's a more interesting multi-line notecard program. Imagine a notecard named "fancy necklace" containing the following lines:
  • ODDLINKS
    PENDANT 0.3

    LINKTYPE FLAT
    LINK fancy pendant~20~<0,0,0>~<0,0,0>
    LINK giant diamond~10~<0,0,0>~<0,0,0>

    LINKTYPE ALTERNATE
    LINKANGLE 20
    LINK tiny link~5.737305~<0.0,>~<-0.00005, 0.00003, -0.00940>

  • so, after issuing a "/1 RUN fancy necklace" command, what does this program do? LinkRez reads each line in order
    1. ODDLINKS: sets up to rez only ONE front center link
    2. PENDANT 0.3: the necklace will have a little bit of a pendant "point" to it
    3. LINKTYPE FLAT: the subsequent LINKs to be rezzed will lie flat against the body
    4. LINK fancy pendant...: the LINK command tells LinkRez to rez a link, but since we have ODDLINKS active, only ONE "fancy pendant" will be rezzed, front and center, flat against the body
    5. LINK giant diamond...: the LINK command will now rez ONE left and right PAIR of "giant diamond", also flat against the body
    6. LINKTYPE ALTERNATE and LINKANGLE 20: set up so that subsequent rezzed LINKs will alternate back and forth by 20 degrees, to form a nice chainlink effect
    7. LINK tiny link...: rez ONE left and right pair of "tiny link", offset by 20 degrees from "flat"
    8. now, the end of the notecard has been reached; LinkRez will use the last rezzed LINK ("tiny link") at the last known settings "LINKTYPE ALTERNATE" and "LINKANGLE 20" to finish the entire necklace

  • the final result will be a necklace with a single central "fancy pendant," flanked by a pair of "giant diamond,"and completed with an alternating chain link of "tiny link"

  • notice that blank lines are ignored, which can help break up a long notecard program into understandable chunks

  • also be aware that anything after a "/" character (inclusive) on a notecard line will be ignored, which can allow you to put comments into a notecard program

  • do NOT use the "/" or "~" character in link names, because these characters specify comments and delimiters respectively


Notecard programs can include commands that change the shape, size, and angle of the guide ellipses, using the GUIDE command
  • each time you ran a "/1 TEST" or "/1 LINK", LinkRez chats the ellipse GUIDE parameters
  • this line can be copied and pasted into a notecard program, to set the GUIDE ellipse sizes and angles
  • combined with the BEND and PENDANT parameters, the complete shape of the necklace is determined, and can be loaded from notecard programs
  • if you have a notecard program with no LINK commands, no LINKs will be rezzed
  • this can be handy to have notecard programs that simply store necklace shapes, but no necklace link information, so you can easily reconfigure the LinkRez Object to be ready to run an actual LINK containing
    • for example, you might have saved necklace shapes in the notecards "Ged," "Sierra," and "Eleanora," along with the previous necklace program "fancy necklace"
    • then, you could issue:
      "/1 RUN Ged" + "/1 RUN fancy necklace"; wait for necklace to rez, then
      "/1 RUN Sierra" + "/1 RUN fancy necklace"; wait for necklace to rez, then
      "/1 RUN Eleanora" + "/1 RUN fancy necklace"
      ... and you would have 3 "fancy necklace"s, but each fitted to a different individual


Lesson 8: more powerful notecard programs, repeating sets of links

In the previous lesson, you created a moderately complex notecard program using 3 different types of links. In this lesson the REPEAT ## and REPEATUNTIL ## commands will be introduced, which allow you to repeat any set of links either a specific number of times, or until a specific position on the necklace.

For example, what if you wanted 30 "small links," followed by completing the necklace with as many "tiny links" as needed?

You COULD do it by pasting the "LINK small link~##~##~##" line 30 times, and then the "tiny link" line, but that's inelegant. Instead, you can use the REPEAT command:
  • REPEAT ##
    ...
    ...
    ENDREPEAT

  • repeats all the commands between REPEAT ## and ENDREPEAT, a total of ## times
This would yield a notecard program that would look like:
  • REPEAT 30
    LINK small link~##~##~##
    ENDREPEAT

    LINK tiny link~##~##~##
Much nicer!

But, what if you wanted to use "small link" just to the exact left and right "sides" of a necklace, regardless of how many links that took (which will be different, depending on the circumference of the necklace), and THEN switch to "tiny link"? The REPEATUNTIL command allows you to repeat a set of links until a particular PLACE around the necklace.

  • REPEATUNTIL ##
    ...
    ...
    ENDREPEAT

  • repeats all the commands between REPEATUNTIL and ENDREPEAT, until the links have been rezzed to ## DEGREES
  • 0 degrees is the front of the necklace; 90 degrees is the side; 180 degrees is the back
  • any intermediate value can be used as well
This would yield a notecard program that would look like:
  • REPEATUNTIL 90
    LINK small link~##~##~##
    ENDREPEAT

    LINK tiny link~##~##~##

Note that you can combine as many REPEAT loops, REPEATUNTIL loops, different sets of LINKs, LINKTYPEs, and LINKANGLEs, as you wish, to construct necklaces as complex as you want.

And then, using saved necklace "GUIDE" and "BEND"-containing notecards, you can make these complex necklaces precisely fit as many different individual avatars as you like.


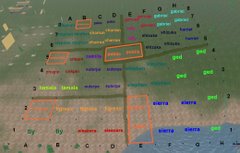
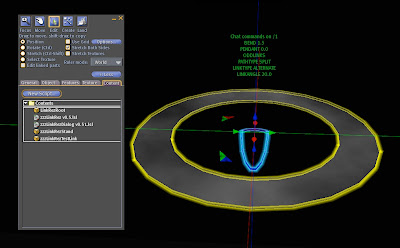
Here's an example of a necklace created by a necklace program notecard, using 3 different links:

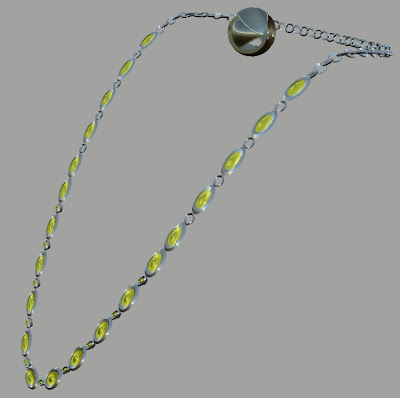
Here, the necklace program consists of something like:
  • ODDLINKS
    LINKTYPE FLAT
    LINK large oval~##~<#,#,#>~<#,#,#>

    REPEAT 5
    LINK small oval~##~<#,#,#>~<#,#,#>
    LINK large oval~##~<#,#,#>~<#,#,#>
    END REPEAT

    REPEATUNTIL 80
    LINK large oval~##~<#,#,#>~<#,#,#>
    LINK metal ring~5~<#,#,#>~<#,#,#>
    ENDREPEAT

    LINKTYPE ALTERNATE
    LINKANGLE 20
    LINK metal ring~3~<#,#,#>~<#,#,#>
  • starting with a CENTER large oval link (so the total # of links will be ODD in this necklace)
  • then, repeating a small oval + large oval set five times
  • then, repeating a large oval + metal ring four times (to "80 degrees")

    the above links were all placed "flat" to the body

  • finally, using just metal rings, but alternating the angle + and - 20 degrees from "flat" against the body
    • the "length" of the metal rings was decreased from what was used in the previous segment, so that they would intersect, while the earlier segment, they touched edge-to-edge


Lesson 8b: More convenient access to LinkRez Notecard Programs (new to LinkRez v1.01)

Because Notecard Programs are so fundamental to getting the most out of LinkRez, in version 1.01, based on a suggestion from a LinkRez user, I added a much more convenient way to access your notecard programs. Simply TOUCH the LinkRez Object, and a dialog menu will come up showing an alphabetical list of ALL notecards present in your LinkRez Object. Selecting any button will run that notecard program.

One very powerful way to use this feature might be to:
  1. have a whole bunch of notecard programs specifying ONLY the GUIDE, PENDANT, and BEND command lines, which would specify the SHAPE and SIZE of a necklace. Don't include ANY specific link information. For example, these might specify a male and female sizes of choker necklaces, long loopy necklaces, bracelets, and even rings.

  2. have another set of notecard programs specify actual LINKS, LINKTYPEs, LINKANGLEs, and REPEAT commands, but WITHOUT sizing information
Then, you can mix and match by first running one program from the first set of notecards, specifying a necklace size and shape, and then running a program from the second set, which would actually create the necklace.

As you collect more and more links and notecard programs, you'll find that you can VERY quickly create entire collections of jewelry, sized for specific avatars.


Conclusion

I hope you have as much fun designing and creating with the assistance of LinkRez, as I had scripting it. Feedback would be welcome! Please post comments on the blog, or IM / notecard me in-world to "Ged Larsen," or email me at ged (dot) larsen (at) gmail (dot) com.

Even better, please drop me pictures of your creations, and let me know if I might be allowed to post them here, and whether you'd like to be attributed. I have very little skill (OK, let's be honest, NO skill) in creating and building myself, so I especially appreciate being able to see what my scripts have helped contribute to. It's very gratifying to me.

Regards!
Ged Larsen

LinkRez Tips, Tricks, and Ideas

LinkRez Tips, tricks, and ideas

Changing the "LinkRezRoot" helper
  • when LinkRez completes a necklace, it rezzes an object from the LinkRez Object contents called "LinkRezRoot" in a position and orientation that might be helpful as a root prim for a necklace attached at the "Chest" attachment point
  • however, the included "LinkRezRoot" is created by me, which would mean that if used as the root prim of your necklace, the entire necklace would list ME as the creator
  • to fix that, simply delete the "LinkRezRoot" out of the the LinkRez Object contents, and replace it with your own "LinkRezRoot" object

    i.e.,

  • rez the LinkRez Object; right-click on it; select Edit; and open the Contents tab
  • right click on "LinkRezRoot" and Delete it
  • create your own prim that you'd like to use as the new LinkRezRoot
  • rename it LinkRezRoot, right click on it and Take it into your inventory
  • drag YOUR LinkRezRoot from your inventory into the Contents of your LinkRez Object


Making a (very simple) ring
  • LinkRez really isn't ideal to make rings, because rings are too small and benefit less from 'automated precise path placement' (which is the main strength of LinkRez), and much more from artistic, hand-placement
  • but, here's how you might go about doing it
  • this is a side view of a standard necklace shape; notice the "drop" of both the purple and blue guides, and notice how BIG they are

  • using Edit Linked Parts, rotate the angles of both the blue and purple guides to have NO drop; rings don't typically have a "bend" to them

  • here's a top down view of the "flattened" necklace; notice that it's still way too big to use for a ring

  • so again, use the Edit Linked Parts to resize both the purple and blue guide ellipses to near minimum size (perhaps from 0.010 to 0.020 meters, in the X and Y sizing boxes)

  • make sure you use the BRACELET setting, wither via a "/1 BRACELET" chat command (after which you can use the /1 TEST command to see a test run), or include a "BRACELET" line in your notecard program
    • the BRACELET setting does NOT affect the size or shape of the rezzed object
    • instead, the BRACELET setting instead keeps orientation of the links the same on the FRONT and BACK halves of the rezzed object

  • below, I show a notecard program using some of the links that were in the L$1 "LinkRez Tool Box #1," to show a sample program that would create a tiny ring of gems


Tips on making tiny prims and creating a personal library of linksAdvanced: simplified LINK information
  • if a link's "center point" in Second Life is the same as the desired "center point," AND if the "forward directionality" of the link is along the X-axis, a LINK command can be simplified to "LINK linkname~length," leaving out the rotation and position offset parameters (which are <0,0,0> and <0,0,0> anyhow)

Ultra-advanced: information encoded in the rez parameter
  • when LinkRez rezzes an object link, it passes a start parameter that encodes both the link pair number as well as the angle in radians, in the following format:
  • LinkRez transmitted param: rezzedPairs*1000000 + llRound ( theta * 100000 )
  • this information can be decoded in a script included in the rezzed object, to do silly things like this

Join the "Script Thingies" group, for new product announcements, updates, and user-to-user product support

LinkRez FAQ / Troubleshooting

LinkRez Frequently Asked Questions / Troubleshooting


The necklace disappears after a few seconds! I am using the /1 TEST command
  • the /1 TEST command is ONLY to get a TEMPORARY necklace rezzed, so that you can more conveniently see how well the necklace chain will fit, while adjusting the chain length, width, and shape
  • to make a lasting necklace, you need to continue to Part II of the instructions (lessons 6 + 7), to create your OWN links, size them on the sizing board, and load the LinkRez object with the links
  • then, you would use the /1 LINK command to create a necklace using a single type of link, OR design a notecard program and use it with the /1 RUN command, which would allow you to use many different links within the necklace
  • or, to get started more quickly, you can pick up the L$1 box of sample links (which have sizing information already, in the description field), at the Linji Sim ScriptThingies store. Load these sample links into your LinkRez Object, and then try the /1 LINK or /1 RUN commands on the sample links

When I link the necklace chain, the creator is listed as Ged Larsen!
  • Change the LinkRezRoot prim in the the LinkRez Object to one that you created, as described here

Why are all the links placed totally weird?
  • there was probably a problem with the parameters generated by the Sizing Board
  • please try again, being careful to align the link precisely with all three axes

When I use the /1 BRACELET command, there's a weird bend or kink in the bracelet!
  • if you are trying to make a bracelet, and there's a weird bend in it, make sure that the purple and blue guide ellipses are PARALLEL to the clear disk

Why are all the links on one side of the necklace upside down?
  • you need to specify PATHTYPE FOLLOW (instead of the default PATHTYPE SPLIT)
  • you may also need to place your object on the Sizing Board differently than you are accustomed to. For example, with a lace collar ruffle, you might want to place it as follows:


Where's my pose stand?
  • "TOUCH" your LinkRez Object, and a pose stand will be rezzed

Where's my sizing board?
  • "TOUCH" your LinkRez Pose Stand, and a sizing board will be rezzed

Nothing happens when I rez LinkRez! Touching it doesn't do anything!
  • you are probably in a NO SCRIPT zone

I'm getting the error "Object ### not found," but I know it's in the LoopRez Object contents
  • make sure that the names are identical -- upper case, lower case, spaces: "Link" is diferent from "link" is probably different from "link "

I'm getting the error "DANGER -- 150 link pairs rezzed, may be stuck in infinite loop. Use REZLIMIT command to increase limit. RESETTING SCRIPT."
  • LinkRez can work with really, really tiny prims, and you could theoretically make a necklace chain consisting of 1,000+ prims, if you used links that were really, really tiny
  • however, since the SL limits the number of prims that can be in a single link set (to 254, I think), I've limited LinkRez to rezzing 150 pairs of links (at least 300 prims)
  • if you really want to make LinkRez rez more prims, type "/1 REZLIMIT ##", where ## is how many maximum pairs you want to have, instead of 150
  • if you did NOT intend to use a tiny tiny link, then you probably messed up with the Sizing Board, and are telling LinkRez to use too small a link size

I can't link the objects! It says "Objects too far apart"
  • unfortunately, when Second Life is misbehaving badly or there are internet problems / high packet loss, one of the common manifestations is an inability to link
  • one user suggests: if the necklaces aren't linking, it may be because they have linked parts already; try delinking the entire thing, use Edit --> drag selection box --> Control-L; it may link then
  • there's little I can do, from a scripting standpoint, about this. You might try again in a less laggy Sim, or on another day.

LinkRez Command List

LinkRez Chat Command List


Default chat channel to use commands: /1

BEND ##
  • ## is a number greater than 1.0
  • 1.0 will have the necklace follow the guide ellipse exactly
  • the bigger ## is, the farther out from the guide ellipse the necklace will go
  • 1.3 to 1.5 seems to work OK, but I want YOU all to tell me what works for you

PENDANT ##
  • ## is a number between 0.0 and 1.0
  • 0.0 is a perfectly rounded front
  • 1.0 is a completely pointy front

LINKTYPE ##
  • ## is one of ["FLAT", "INCREMENT", "ALTERNATE", "RANDOM", "CONSTANT"]
  • FLAT against body
    • when FLAT is set, the LINKANGLE setting is ignored
    • this is equivalent to using /1 LINKTYPE CONSTANT and /1 LINKANGLE 0
  • INCREMENT the angle of each successive link by LINKANGLE
  • ALTERNATE the angle of each successive link by plus or minus LINKANGLE
  • RANDOM -- spins the link randomly along the axis of the necklace
  • CONSTANT -- applies a constant angle change from the "FLAT" angle

LINKANGLE ##
  • ## is a number in DEGREES that LINKTYPE INCREMENT, ALTERNATE, and CONSTANT uses

PATHTYPE ##
  • ## is one of ["SPLIT", "FOLLOW"]
  • determines whether the links "SPLIT" from the front, or "FOLLOW" one another
  • important when the link is NOT symmetric, along various axes

EVENLINKS
  • rezzes pairs of links only
  • this is the default

ODDLINKS
  • rezzes a single front and center link, and then paired links subsequently
  • looks good with rounded fronts (low PENDANT), and terrible for pointy fronts

TEST
  • using the necklace parametersabove, rezzes a "test necklace" made up of Temp-On-Rez links, so you can more easily test how well the necklace will fit

LINK LINKNAME~LENGTH~rotOffset~posOffset
  • create a necklace made up of a SINGLE prim type, without needing to use a notecard program
  • LINKNAME is the case-sensitive name of the link to be rezzed
  • LENGTH is the length in MILLIMETERS (not meters), of each link
  • rotOffset and posOffset are OPTIONAL: if they are not included, they will be assumed to be ZERO_ROTATION and ZERO_VECTOR
  • you can get LINKNAME~LENGTH~rotOffset~posOffset from the sizing board
  • e.g., LINK oval~6 --> rezzes an entire necklace using prim "oval", treating each oval as 6 millimeters long

RUN ##
  • run an entire necklace notecard program ##

CHANNEL ##
  • changes the chat channel for commands to ##

HIDE
  • toggles showing and hiding the guide ellipse / disk plane

REZLIMIT ##
  • to prevent inadvertent infinite loops of rezzing, if a rez limit is exceeded, the script stops
  • defaults to 300 links rezzed
  • you can change the limit to ##

RESET
  • resets the script and guide ellipses
  • unfortunately, will only work if the script is not currently doing anything


DELAY ##
  • delay time in seconds, between rezzing each link
  • defaults to 0, which should be completely fine

NECKLACE (default)
  • rotations in front and back of necklace are appropriate for use as a necklace

BRACELET
  • rotations in front and back of necklace are appropriate for use as a bracelet or ring
  • it's important to note that BRACELET does NOT change the size or shape of the rezzed object
  • to make a bracelet, you'll want to
    • 1) decrease the SIZE of both the front and back guide ellipses
    • 2) rotate the guide ellipses so that there is no "bend" between the front and back
  • what the BRACELET setting does is keep the links in the same orientation between the front and back halves of the rezzed object

LinkRez Tutorial

LinkRez Tutorial, part I


Welcome to the LinkRez tutorial, part I. It is designed to be a step-by-step introduction to all the features of the LinkRez necklace chain generator, from basic to advanced. If any part of it seems unclear or confusing, or you think that an additional screenshot would help, please post a comment so that I can improve the documentation.


Introduction to LinkRez: what comes in the box?

When you first receive the LinkRez box, rez it on the ground and take its contents to inventory. Definitely KEEP a copy of your original box -- it'll serve as a backup copy, in case anything happens to your work copy.

Drag the LinkRez Object from your inventory onto the ground. It will automatically determine that there is no LinkRez "posing stand" or "sizing board" (more about this later) nearby, and rez copies of them in appropriate position.


LinkRez Object
  • the LinkRez Object is composed of two sizing "guide ellipses" and a transparent disk
    • these objects will allow you to position, size, and shape the necklace, by editing them with the Second Life Edit interface
  • the BLUE half ellipse shows the approximate path of the FRONT half of the necklace
  • the PURPLE half ellipse shows the approximate path of the BACK half of the necklace
  • the transparent disk is an easier to select object to help position the necklace; it can also be tilted

Pose Stand
  • this is rezzed by the LinkRez Object, if it is not nearby, and is helpful as you precisely shape the necklace to custom fit an avatar
  • if you are missing the Pose Stand, just "Touch" the LinkRez Object, and a pose stand will be rezzed
  • because it is not possible for scripts to determine where the "floor" is (you might be in a sky platform), the pose stand is rezzed at the position of the LinkRez Object, and the LinkRez Object then moves ~2 meters up

Sizing Board
[##PICTURE##]
  • this is rezzed by the Pose Stand, if it is not nearby, and is crucial for defining the proper orientation and size of your custom-designed necklace links
  • if you are missing the Sizing Board, just "Touch" the Pose Stand and a Sizing Board will be rezzed
  • the Sizing Board will ALWAYS be kept with its rotation axes aligned with the world axes, to help you precisely size your custom links
You've now been introduced to the components of the LinkRez system. In the next lesson, you will create a precisely designed necklace with a single word.


Lesson 1: creating a necklace in less than a minute with one word

By default, LinkRez listens to chat commands on channel /1 (although you can change that with the "/1 CHANNEL ##" command).

You will now create your first necklace. After rezzing a copy of the LinkRez Object, notice the size and orientation of the front (blue) and back (purple) Guide Ellipses, as well as the floating green text with a number of cryptic words and numbers. The guide ellipses and floating text describe what the generated necklace will look like, and you will shortly become much more familiar with them.

For now, though, let's generate a test necklace. Don't worry, it's very easy:
  • type "/1 TEST"
The guide ellipses will become transparent, and you will see LOTS of tiny little links rezzing into a nice, smooth necklace. Congratulations!

If you want to get a better view of the rezzed links, you can:
  • type "/1 HIDE"
to toggle the visibility of the guide ellipses on and off.


Using the current necklace size / shape settings, the "/1 TEST" command rezzes a necklace made up of Temporary-On-Rez links. These Temp-On-Rez links will disappear after a minute or so, and are VERY helpful as you tweak the necklace shape, experiment with settings, etc., so that you don't have to keep on selecting and deleting your rezzed necklaces.

Notice how the links roughly follow the path of the sizing guide ellipses -- in future lessons, you'll learn how to adjust how close or far from the path the links are rezzed.

Also notice that a whole bunch of lines got spoken to the CHAT window. These include lines starting with GUIDE FRONT, GUIDE BACK, BEND, etc. Remember these lines! They will be very helpful in the future, as they describe many aspects of the necklace. In future lessons, you'll learn that you can cut and paste these lines from the Chat History into a notecard, and load the settings by using notecard programs.

You've now created your first necklace, using a single command. Notice how the links all lie "flat" against the body. In the next lesson, you will discover how easy it is to customize how the links lie.


Lesson 2: changing the orientation of the necklace links

With the "/1 LINKTYPE" chat command, you can change the orientation of the necklace links. The pictures below of each LINKTYPE are of "bracelets" (NOT necklaces), because it's easier to see how the LINKTYPES differ. Here are the five different options:
  • /1 LINKTYPE FLAT
    • this simulates having the links lie "flat" against the body


  • /1 LINKTYPE ALTERNATE
    • each successive link will alternate plus or minus LINKANGLE degrees


  • /1 LINKTYPE INCREMENT
    • each successive link will increment its rotation by LINKANGLE degrees


  • /1 LINKTYPE CONSTANT
    • each link will be adjusted from "flat' against the body by LINKANGLE degrees


  • /1 LINKTYPE RANDOM
    • each link will be rotated randomly around the axis of the path of the necklace (think of a bead necklace, with the beads rotating around the string)


The above commands (except "flat" and "random") use the LINKANGLE command to know how many degrees to rotate the links. Set LINKANGLE chatting the comamnd:
  • /1 LINKANGLE ##, where ## is the number of degrees (negative numbers are OK)

A picture is worth a thousand words, but seeing necklaces rezzed in front of you is even better, so go ahead and try each of these.


Change to "alternating" links
  • type "/1 LINKTYPE ALTERNATE"
  • type "/1 TEST"
  • zoom in, and you'll see that each successive link "alternates" + or - 20 degrees (set by the LINKANGLE) from flat against the body

Change to "incrementing" links

  • wait for the first necklace to disappear, OR drag the LinkRez Object a little bit to the side, so that you don't rez the 2nd necklace over the first one
  • type "/1 LINKTYPE INCREMENT"
  • type "/1 TEST"
  • zoom in, and you'll see that each successive link "twists" an additional 20 degrees (set by the LINKANGLE) from the previous link
If you'd like, go ahead and try out "/1 LINKTYPE CONSTANT" and "/1 LINKTYPE RANDOM" too. Just imagine how tedious it would be to adjust all these links by hand...

The example pictures at the top of this lesson were bracelets and not necklaces. Look closely at the necklaces that you just created, and you'll see how a "NECKLACE" differs from a "BRACELET." Hint: here's what a flattened "NECKLACE" would look like, with the front of the necklace to the left, and the back to the right:
...and, I bet you can guess by the capitalized words above, what the chat command will be to switch between the two different types... But, that's a later lesson.

In the next two lessons, you'll learn how to precisely fit a necklace to an avatar by adjusting the guide ellipses (and other parameters), to change the shape and size of the necklace.


Lesson 3: custom sizing the necklace: using the Guide Ellipses

In this lesson, you will customize the size of the necklace, by changing the size and orientation of the Guide Ellipses.
  • open the edit window (under Tools menu, or press CTRL-3)
  • check the "Edit linked parts" checkbox
  • check the "Stretch Both Sides" checkbox
  • click the front BLUE half ellipse to select it (it should glow when it's selected)


  • press and hold CTRL- and SHIFT- to reveal the resizing arrows (or select the Stretch radio button)
    • drag the GREEN sizing box to change the width of the necklace guide
    • drag the RED sizing box to change the front length of the necklace guide


  • press and hold CTRL- to reveal the rotation circles (or select the Rotate radio button)
    • drag the GREEN rotation circle to change the angle of the front drop
    • it's OK for part of the ellipse to "dig into" a "posed" avatar, so long as the tip of the ellipse is outside the avatar. This is because the BEND parameter, described in the next lesson, controls how far "out" the rezzed links go, away from the guide ellipse
    • if you've rotated the LinkRez Object, you may need to select "Ruler mode" Local from the pull-down menu


  • type "/1 TEST"
  • notice that the new necklace size is determined by how you resized and rotated the guide ellipse
  • you can do this while properly positioned over a pose stand, to precisely fit necklaces to an avatar
  • this works with the back guide ellipse too; try it!
As mentioned before, the necklace links come "off" of the guide ellipses a certain amount. In the next lesson, you'll learn how to modify how far off the links deviate from the guide ellipses, as well as how to make the front of the necklace more "pointy", for hanging pendants.


Lesson 4: changing the shape of the necklace

While the size and angles of the front and back guide ellipses control the rough shape and size of the necklace, two additional parameters, BEND and PENDANT, can be used to further fine tune necklace fitting.


Change the necklace "drop" with the BEND parameter

The BEND parameter controls how far out the necklace deviates off from the guide ellipse, before "dropping" down to intersect the end of the guide ellipse.

A bend parameter of 1.0 tracks the guide ellipses exactly, while higher values will track closer to the transparent disk plane longer, before "dropping" back down to the guide ellipse. A value of around 1.5 seems to work pretty well for most avatar shapes.

If you do the following steps quickly, before the Temp-On-Rez links disappear and without moving the LinkRez Object, you can overlay multiple necklaces with different BEND parameters to compare how they look.
  • type "/1 BEND 1.0"
  • type "/1 TEST"
    • the necklace perfectly tracks the guide ellipses
    • notice that the connection between the front and back halves of the necklaces is a bit angular, and not very smoothly curved
  • type "/1 BEND 2.0" and then "/1 TEST" again
    • notice that the necklace comes "off" of the guide ellipse, and that the curve over the shoulder is a bit smoother
increasing BEND parameter, from 1.0 on the far left to 2.0 on the right


overlaid necklaces with BEND parameters of 1.0, 1.5, and 2.0


Change the "pointiness" of the necklace with the PENDANT fraction


Sometimes you'll want a smoothly rounded front of the necklace; sometimes a "pointy" front, especially if you plan to attach a hanging pendant to the necklace. The "pointiness" of the necklace is adjusted by the PENDANT fraction parameter.

A pendant fraction of 0.0 is completely rounded, while a value of 1.0 results in a very straight "triangular" shape from the shoulder tops to the front tip of the necklace. Try it!
  • the previous necklaces were probably generated with a PENDANT fraction of 0.0
  • type "/1 PENDANT 0.5" and then "/1 TEST"
  • notice that the front of the necklace is now pointy, better for "pendants"

increasing PENDANT fraction, from 0.0 on the left, to 1.0 on the right


overlaid necklaces with PENDANT fractions of 0.0, 0.4, and 0.8


The next lesson completes the last few commands available for setting necklace shape parameters.


Lesson 5: tweaking details of necklaces, bracelets, and rings

OK, we're almost done with the options available for necklace parameters. The last ones are: EVENLINKS / ODDLINKS, PATHTYPE, and NECKLACE / BRACELET


The first pair of commands is EVENLINKS and ODDLINKS
  • EVENLINKS (default) -- rezzes pairs of links, on the left and right sides
  • ODDLINKS -- rezzes a single link in front, and then paired links on either side subsequently
    • ODDLINKS is marginally less accurate for placement of the very first link, but subsequent links will be accurate
    • for obvious reasons, ODDLINKS does not work well, if there is significant PENDANT fraction pointiness in the front

EVENLINKS (left) and ODDLINKS (right)


PATHTYPE [SPLIT/FOLLOW]: the result of this option is far easier to see in pictures than to describe in text. Basically, when pairs of links are placed on the left and right sides, it's possible for the links to be placed so that the links "SPLIT" from one another or "FOLLOW" each other.

So, the options are:
  • /1 PATHTYPE SPLIT (the default)
  • /1 PATHTYPE FOLLOW

"/1 PATHTYPE SPLIT", results in the links appearing to split away from one another from the centerline


"/1 PATHTYPE FOLLOW", results in the links appearing to follow one another at the centerline

Why would this be useful? If looking along the "forward" path of a link, the left and right sides of the link are different, you probably want to use PATHTYPE FOLLOW. An example of this would be trying to generate a neckline trim:

left: PATHTYPE SPLIT
right: PATHTYPE FOLLOW


The last pair of commands are NECKLACE (default) and BRACELET. This controls whether the front and back half of the rezzed object have a change in link rotation, and is also better understood with a picture:

"/1 NECKLACE" results in a 90 degree rotation, from the front to the back of the rezzed necklace, so that the front of the necklace lies flat against the torso, while the back presses against the back of the neck


"/1 BRACELET" results in no rotation from the front to the back, and is more appropriate for rings, bracelets, and skirts. IMPORTANT: if you are trying to make a bracelet, and there's a weird bend in it, make sure that the purple and blue guide ellipses are PARALLEL to the clear disk.


Congratulations! You have now seen all of the options available for necklace and link sizing, shaping, fitting, and rotation. We'll end this first half of the LinkRez Tutorial with a review and some tips for custom-fitting necklaces with LinkRez.

In the second half of the tutorial, you will learn how to (finally!) stop using the Temp-On-Rez sample links, and start using custom links of your own, as well as how to use notecard programs to generate necklaces made from as many different types of links as you like, each of which can have it's own rotational adjustment LINKTYPE, etc.


Review of how to custom-fit necklaces with LinkRez

You've now been introduced to all the options for changing the shape of the necklaces. The following is a collected summary of ideas for custom fitting avatars, repeating the information of the above lessons.

LinkRez Object consists of 3 prim parts:
  • "root plane": transparent disk, sets the overall position of the necklace chain, and can be tilted
  • front blue guide ellipse: front half length and angle, and width
  • back purple guide ellipse: back half length and angle, and width
Two parameters set by chat commands
  • /1 BEND ##: how much the necklace curves AWAY from the guide ellipse, to allow a rounded, over-the-shoulder drape
    • 1.0 (tracks guide ellipse perfectly); larger values come away from the guide ellipse further
    • try values from 1.3 to 2.0
  • /1 PENDANT ##
    • how pointy the front of the necklace will be
    • from 0.0 (completely rounded) to 1.0 (completely pointy)

Pose avatar on posestand

Position the "root plane" to "center" the necklace chain properly
  • right-click the "root plane" and select edit
  • move to the correct height, at the very top of the shoulders
  • move to centered, with respect to left and right
  • move forward and back, so that the "break" between the guide ellipse front and back halves is at the very top of the shoulders; perhaps JUST in front of the tops of the shoulders works better

Now, make sure the Edit window is open, and that:
  • "Edit Linked Parts" is CHECKED
  • "Stretch Both Sides" is CHECKED

Stretch and position the "front half ellipse"
  • STRETCH (ALT-SHIFT) the width to the desired width
  • STRETCH (ALT-SHIFT) the front tab to the desired length
  • ROTATE (ALT) so that the VERY front of the ellipse just emerges from the avatars body
  • it's OK if parts of the ellipse are embedded in the avatar body, so long as the tip of the ellipse is outside, because modifying the BEND parameter will change how much the chain comes "forward" from the plane of the half ellipse

Stretch position the "back half ellipse"
  • ROTATE (ALT) to the desired angle
  • STRETCH (ALT-SHIFT) the back tab so that the back of the ellipse is outside the back of the neck

Check how the necklace chain will look by using the "/1 TEST" command
  • rezzes a necklace chain, using Temp On Rez prims that will disappear after a minute or so
  • adjust as needed

Adjustments
  • if the necklace is embedded in the avatars body, you can:
    • use a higher bend parameter
    • move the entire "root plane" forwards a little bit (and then readjusting the front and back half ellipses)

  • if the necklace comes "off" the avatar's torso too far, you can:
    • use a lower bend parameter
    • move the entire "root plane" back a little bit (and then readjusting the front and back half ellipses)

  • if you want the "top" of the necklace to be more rounded (less angular from front half to back half), use a higher bend parameter
    • because this will make the necklace come "out" away from the guide ellipse more, you may need to move the guide ellipses BACK a little bit

  • once you have settings that fit an avatar perfectly, SAVE them for re-use in future necklace chains
    • notice that when you create a necklace, a number of lines of of parameters are sent to chat
    • copy these lines from the chat history, and paste them into a notecard
    • in future lessons, you'll learn how to automatically load these settings from the notecard using the "/1 RUN " command


Conclusion

This completes Part I of the LinkRez tutorial. Part II will discuss using your own custom-designed links and notecard programs.