LinkRez Tutorial, part I
Welcome to the LinkRez tutorial, part I. It is designed to be a step-by-step introduction to all the features of the LinkRez necklace chain generator, from basic to advanced. If any part of it seems unclear or confusing, or you think that an additional screenshot would help, please post a comment so that I can improve the documentation.

Introduction to LinkRez: what comes in the box?
When you first receive the LinkRez box, rez it on the ground and take its contents to inventory. Definitely KEEP a copy of your original box -- it'll serve as a backup copy, in case anything happens to your work copy.
Drag the LinkRez Object from your inventory onto the ground. It will automatically determine that there is no LinkRez "posing stand" or "sizing board" (more about this later) nearby, and rez copies of them in appropriate position.

LinkRez Object
- the LinkRez Object is composed of two sizing "guide ellipses" and a transparent disk
- these objects will allow you to position, size, and shape the necklace, by editing them with the Second Life Edit interface
- the BLUE half ellipse shows the approximate path of the FRONT half of the necklace
- the PURPLE half ellipse shows the approximate path of the BACK half of the necklace
- the transparent disk is an easier to select object to help position the necklace; it can also be tilted
Pose Stand
- this is rezzed by the LinkRez Object, if it is not nearby, and is helpful as you precisely shape the necklace to custom fit an avatar
- if you are missing the Pose Stand, just "Touch" the LinkRez Object, and a pose stand will be rezzed
- because it is not possible for scripts to determine where the "floor" is (you might be in a sky platform), the pose stand is rezzed at the position of the LinkRez Object, and the LinkRez Object then moves ~2 meters up
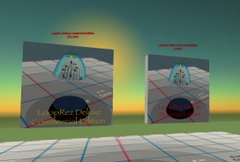
Sizing Board
[##PICTURE##]
- this is rezzed by the Pose Stand, if it is not nearby, and is crucial for defining the proper orientation and size of your custom-designed necklace links
- if you are missing the Sizing Board, just "Touch" the Pose Stand and a Sizing Board will be rezzed
- the Sizing Board will ALWAYS be kept with its rotation axes aligned with the world axes, to help you precisely size your custom links
Lesson 1: creating a necklace in less than a minute with one word
By default, LinkRez listens to chat commands on channel /1 (although you can change that with the "/1 CHANNEL ##" command).
You will now create your first necklace. After rezzing a copy of the LinkRez Object, notice the size and orientation of the front (blue) and back (purple) Guide Ellipses, as well as the floating green text with a number of cryptic words and numbers. The guide ellipses and floating text describe what the generated necklace will look like, and you will shortly become much more familiar with them.
For now, though, let's generate a test necklace. Don't worry, it's very easy:
- type "/1 TEST"
If you want to get a better view of the rezzed links, you can:
- type "/1 HIDE"

Using the current necklace size / shape settings, the "/1 TEST" command rezzes a necklace made up of Temporary-On-Rez links. These Temp-On-Rez links will disappear after a minute or so, and are VERY helpful as you tweak the necklace shape, experiment with settings, etc., so that you don't have to keep on selecting and deleting your rezzed necklaces.
Notice how the links roughly follow the path of the sizing guide ellipses -- in future lessons, you'll learn how to adjust how close or far from the path the links are rezzed.
Also notice that a whole bunch of lines got spoken to the CHAT window. These include lines starting with GUIDE FRONT, GUIDE BACK, BEND, etc. Remember these lines! They will be very helpful in the future, as they describe many aspects of the necklace. In future lessons, you'll learn that you can cut and paste these lines from the Chat History into a notecard, and load the settings by using notecard programs.
You've now created your first necklace, using a single command. Notice how the links all lie "flat" against the body. In the next lesson, you will discover how easy it is to customize how the links lie.
Lesson 2: changing the orientation of the necklace links
With the "/1 LINKTYPE" chat command, you can change the orientation of the necklace links. The pictures below of each LINKTYPE are of "bracelets" (NOT necklaces), because it's easier to see how the LINKTYPES differ. Here are the five different options:
- /1 LINKTYPE FLAT
- this simulates having the links lie "flat" against the body

- /1 LINKTYPE ALTERNATE
- each successive link will alternate plus or minus LINKANGLE degrees

- /1 LINKTYPE INCREMENT
- each successive link will increment its rotation by LINKANGLE degrees

- /1 LINKTYPE CONSTANT
- each link will be adjusted from "flat' against the body by LINKANGLE degrees

- /1 LINKTYPE RANDOM
- each link will be rotated randomly around the axis of the path of the necklace (think of a bead necklace, with the beads rotating around the string)

The above commands (except "flat" and "random") use the LINKANGLE command to know how many degrees to rotate the links. Set LINKANGLE chatting the comamnd:
- /1 LINKANGLE ##, where ## is the number of degrees (negative numbers are OK)
A picture is worth a thousand words, but seeing necklaces rezzed in front of you is even better, so go ahead and try each of these.
Change to "alternating" links
- type "/1 LINKTYPE ALTERNATE"
- type "/1 TEST"
- zoom in, and you'll see that each successive link "alternates" + or - 20 degrees (set by the LINKANGLE) from flat against the body
Change to "incrementing" links
- wait for the first necklace to disappear, OR drag the LinkRez Object a little bit to the side, so that you don't rez the 2nd necklace over the first one
- type "/1 LINKTYPE INCREMENT"
- type "/1 TEST"
- zoom in, and you'll see that each successive link "twists" an additional 20 degrees (set by the LINKANGLE) from the previous link
The example pictures at the top of this lesson were bracelets and not necklaces. Look closely at the necklaces that you just created, and you'll see how a "NECKLACE" differs from a "BRACELET." Hint: here's what a flattened "NECKLACE" would look like, with the front of the necklace to the left, and the back to the right:
 ...and, I bet you can guess by the capitalized words above, what the chat command will be to switch between the two different types... But, that's a later lesson.
In the next two lessons, you'll learn how to precisely fit a necklace to an avatar by adjusting the guide ellipses (and other parameters), to change the shape and size of the necklace.
Lesson 3: custom sizing the necklace: using the Guide Ellipses
In this lesson, you will customize the size of the necklace, by changing the size and orientation of the Guide Ellipses.
- open the edit window (under Tools menu, or press CTRL-3)
- check the "Edit linked parts" checkbox
- check the "Stretch Both Sides" checkbox
- click the front BLUE half ellipse to select it (it should glow when it's selected)

- press and hold CTRL- and SHIFT- to reveal the resizing arrows (or select the Stretch radio button)
- drag the GREEN sizing box to change the width of the necklace guide
- drag the RED sizing box to change the front length of the necklace guide

- press and hold CTRL- to reveal the rotation circles (or select the Rotate radio button)
- drag the GREEN rotation circle to change the angle of the front drop
- it's OK for part of the ellipse to "dig into" a "posed" avatar, so long as the tip of the ellipse is outside the avatar. This is because the BEND parameter, described in the next lesson, controls how far "out" the rezzed links go, away from the guide ellipse
- if you've rotated the LinkRez Object, you may need to select "Ruler mode" Local from the pull-down menu

- type "/1 TEST"
- notice that the new necklace size is determined by how you resized and rotated the guide ellipse
- you can do this while properly positioned over a pose stand, to precisely fit necklaces to an avatar
- this works with the back guide ellipse too; try it!
Lesson 4: changing the shape of the necklace
While the size and angles of the front and back guide ellipses control the rough shape and size of the necklace, two additional parameters, BEND and PENDANT, can be used to further fine tune necklace fitting.
Change the necklace "drop" with the BEND parameter
The BEND parameter controls how far out the necklace deviates off from the guide ellipse, before "dropping" down to intersect the end of the guide ellipse.
A bend parameter of 1.0 tracks the guide ellipses exactly, while higher values will track closer to the transparent disk plane longer, before "dropping" back down to the guide ellipse. A value of around 1.5 seems to work pretty well for most avatar shapes.
If you do the following steps quickly, before the Temp-On-Rez links disappear and without moving the LinkRez Object, you can overlay multiple necklaces with different BEND parameters to compare how they look.
- type "/1 BEND 1.0"
- type "/1 TEST"
- the necklace perfectly tracks the guide ellipses
- notice that the connection between the front and back halves of the necklaces is a bit angular, and not very smoothly curved
- type "/1 BEND 2.0" and then "/1 TEST" again
- notice that the necklace comes "off" of the guide ellipse, and that the curve over the shoulder is a bit smoother
 increasing BEND parameter, from 1.0 on the far left to 2.0 on the right
 overlaid necklaces with BEND parameters of 1.0, 1.5, and 2.0
Change the "pointiness" of the necklace with the PENDANT fraction
Sometimes you'll want a smoothly rounded front of the necklace; sometimes a "pointy" front, especially if you plan to attach a hanging pendant to the necklace. The "pointiness" of the necklace is adjusted by the PENDANT fraction parameter.
A pendant fraction of 0.0 is completely rounded, while a value of 1.0 results in a very straight "triangular" shape from the shoulder tops to the front tip of the necklace. Try it!
- the previous necklaces were probably generated with a PENDANT fraction of 0.0
- type "/1 PENDANT 0.5" and then "/1 TEST"
- notice that the front of the necklace is now pointy, better for "pendants"
 increasing PENDANT fraction, from 0.0 on the left, to 1.0 on the right
 overlaid necklaces with PENDANT fractions of 0.0, 0.4, and 0.8
The next lesson completes the last few commands available for setting necklace shape parameters.
Lesson 5: tweaking details of necklaces, bracelets, and rings
OK, we're almost done with the options available for necklace parameters. The last ones are: EVENLINKS / ODDLINKS, PATHTYPE, and NECKLACE / BRACELET
The first pair of commands is EVENLINKS and ODDLINKS
- EVENLINKS (default) -- rezzes pairs of links, on the left and right sides
- ODDLINKS -- rezzes a single link in front, and then paired links on either side subsequently
- ODDLINKS is marginally less accurate for placement of the very first link, but subsequent links will be accurate
- for obvious reasons, ODDLINKS does not work well, if there is significant PENDANT fraction pointiness in the front
 EVENLINKS (left) and ODDLINKS (right)
PATHTYPE [SPLIT/FOLLOW]: the result of this option is far easier to see in pictures than to describe in text. Basically, when pairs of links are placed on the left and right sides, it's possible for the links to be placed so that the links "SPLIT" from one another or "FOLLOW" each other.
So, the options are:
- /1 PATHTYPE SPLIT (the default)
- /1 PATHTYPE FOLLOW
 "/1 PATHTYPE SPLIT", results in the links appearing to split away from one another from the centerline
 "/1 PATHTYPE FOLLOW", results in the links appearing to follow one another at the centerline
Why would this be useful? If looking along the "forward" path of a link, the left and right sides of the link are different, you probably want to use PATHTYPE FOLLOW. An example of this would be trying to generate a neckline trim:
 left: PATHTYPE SPLIT
right: PATHTYPE FOLLOW
The last pair of commands are NECKLACE (default) and BRACELET. This controls whether the front and back half of the rezzed object have a change in link rotation, and is also better understood with a picture:
"/1 NECKLACE" results in a 90 degree rotation, from the front to the back of the rezzed necklace, so that the front of the necklace lies flat against the torso, while the back presses against the back of the neck"/1 BRACELET" results in no rotation from the front to the back, and is more appropriate for rings, bracelets, and skirts. IMPORTANT: if you are trying to make a bracelet, and there's a weird bend in it, make sure that the purple and blue guide ellipses are PARALLEL to the clear disk.Congratulations! You have now seen all of the options available for necklace and link sizing, shaping, fitting, and rotation. We'll end this first half of the LinkRez Tutorial with a review and some tips for custom-fitting necklaces with LinkRez.
In the second half of the tutorial, you will learn how to (finally!) stop using the Temp-On-Rez sample links, and start using custom links of your own, as well as how to use notecard programs to generate necklaces made from as many different types of links as you like, each of which can have it's own rotational adjustment LINKTYPE, etc.
Review of how to custom-fit necklaces with LinkRez
You've now been introduced to all the options for changing the shape of the necklaces. The following is a collected summary of ideas for custom fitting avatars, repeating the information of the above lessons.
LinkRez Object consists of 3 prim parts:
- "root plane": transparent disk, sets the overall position of the necklace chain, and can be tilted
- front blue guide ellipse: front half length and angle, and width
- back purple guide ellipse: back half length and angle, and width
- /1 BEND ##: how much the necklace curves AWAY from the guide ellipse, to allow a rounded, over-the-shoulder drape
- 1.0 (tracks guide ellipse perfectly); larger values come away from the guide ellipse further
- try values from 1.3 to 2.0
- /1 PENDANT ##
- how pointy the front of the necklace will be
- from 0.0 (completely rounded) to 1.0 (completely pointy)
Pose avatar on posestand
Position the "root plane" to "center" the necklace chain properly
- right-click the "root plane" and select edit
- move to the correct height, at the very top of the shoulders
- move to centered, with respect to left and right
- move forward and back, so that the "break" between the guide ellipse front and back halves is at the very top of the shoulders; perhaps JUST in front of the tops of the shoulders works better
Now, make sure the Edit window is open, and that:
- "Edit Linked Parts" is CHECKED
- "Stretch Both Sides" is CHECKED
Stretch and position the "front half ellipse"
- STRETCH (ALT-SHIFT) the width to the desired width
- STRETCH (ALT-SHIFT) the front tab to the desired length
- ROTATE (ALT) so that the VERY front of the ellipse just emerges from the avatars body
- it's OK if parts of the ellipse are embedded in the avatar body, so long as the tip of the ellipse is outside, because modifying the BEND parameter will change how much the chain comes "forward" from the plane of the half ellipse
Stretch position the "back half ellipse"
- ROTATE (ALT) to the desired angle
- STRETCH (ALT-SHIFT) the back tab so that the back of the ellipse is outside the back of the neck
Check how the necklace chain will look by using the "/1 TEST" command
- rezzes a necklace chain, using Temp On Rez prims that will disappear after a minute or so
- adjust as needed
Adjustments
- if the necklace is embedded in the avatars body, you can:
- use a higher bend parameter
- move the entire "root plane" forwards a little bit (and then readjusting the front and back half ellipses)
- if the necklace comes "off" the avatar's torso too far, you can:
- use a lower bend parameter
- move the entire "root plane" back a little bit (and then readjusting the front and back half ellipses)
- if you want the "top" of the necklace to be more rounded (less angular from front half to back half), use a higher bend parameter
- because this will make the necklace come "out" away from the guide ellipse more, you may need to move the guide ellipses BACK a little bit
- once you have settings that fit an avatar perfectly, SAVE them for re-use in future necklace chains
- notice that when you create a necklace, a number of lines of of parameters are sent to chat
- copy these lines from the chat history, and paste them into a notecard
- in future lessons, you'll learn how to automatically load these settings from the notecard using the "/1 RUN
" command
Conclusion
This completes Part I of the LinkRez tutorial. Part II will discuss using your own custom-designed links and notecard programs.