LinkRez Tutorial, part II
Welcome to the LinkRez tutorial, part II. It is designed to be a step-by-step introduction to all the features of the LinkRez necklace chain generator, from basic to advanced. If any part of it seems unclear or confusing, or you think that an additional screenshot would help, please post a comment so that I can improve the documentation.
Welcome to the LinkRez tutorial, part II. It is designed to be a step-by-step introduction to all the features of the LinkRez necklace chain generator, from basic to advanced. If any part of it seems unclear or confusing, or you think that an additional screenshot would help, please post a comment so that I can improve the documentation.
Part I of the tutorial covered necklace sizing and shaping, which allowed you to "fit" a necklace precisely to any avatar.
Part II will discuss custom links and notecard programs, which will allow you to create necklaces using your own links, arranged in any number or order, with as many different types of link placement as you wish.
Lesson 6: Custom links, the Sizing Board, and the LINK command
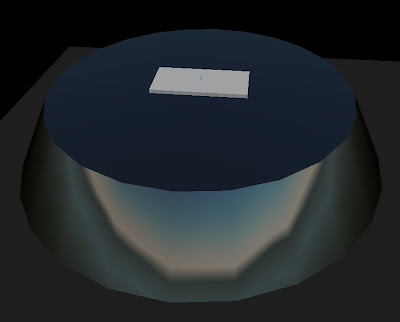
Using the LinkRez Sizing Board properly is absolutely critical to properly place links, especially when using weirdly shaped, twisted, tortured, and rotated prims. When the SizingBoard is used properly, it allows LinkRez to place links with precision better than 0.1 millimeters.
The sizing board determines the:
- "flat" orientation of the link, to allow proper rotation
- "center" location of the link, around which rotations occur
- length of the link, so that links can be placed without overlap or gaps
- sizing board calculations are spoken to chat, to be:
- used in the "LINK" command, to generate an entire necklace using that link, OR
- copied and pasted into a notecard for future use
- it is very helpful to store this information in the description field of your link object
- that way, when you want to use that link again, you won't have to repeat the "sizing board" steps
- in the Script Thingies store (Linji), there will be at least one L$1 "LinkRez Tool Box" which contains links which have been properly "sized," and sizing information saved in the description field. However, you WILL want to learn how to size your own links.
Here's how to use the sizing board:
1) First, create or acquire a link that you would like to use.
- learning how to create tiny prims suitable for jewelry is far beyond the scope of this tutorial, but an excellent place to start is Natalia Zelmanov's jewelry tutorial, particularly lesson 3 which teaches how to make some very useful microprims
2) the LinkRez sizing board should be on top of the LinkRez pose stand
- if you don't have a sizing board, "TOUCH" the pose stand
- if you don't have a pose stand, "TOUCH" the LinkRez Object
- the sizing board will automatically rotate itself to ZERO_ROTATION, so that the world's axes lines up perfectly with the sizing board's axes
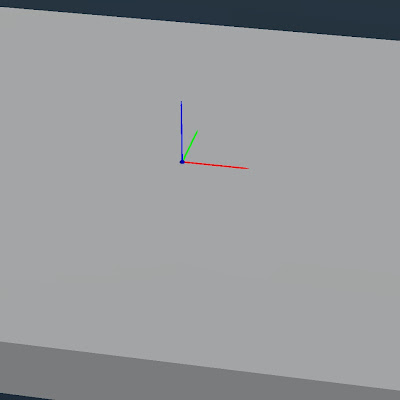
3) the LinkRez sizing board has 3 tiny "toothpicks" sticking out of an even tinier blue dot
- the blue dot is the PRECISE center point
- the 3 toothpicks are colored and oriented to match the world coordinate axes
- the goals are to place your link:
- perfectly flat on the sizing board, in the "red-green" plane,
- perfectly centered with the blue dot, and
- perfectly aligned in the link's "forward" direction along the red toothpick (X-axis)
4) rez your link on the sizing board, and rotate it so that it is lying perfectly flat against the grey sizing board
5) position the link so that it is perfectly centered on the blue dot with the red, green, and blue toothpick axes
- this defines where the CENTER of the link is, where rotations will act
- position offset is a vector offset (in meters)
- the blue dot must be at the center; for TALLER links, half your link's height should be UNDER the surface of the grey slab
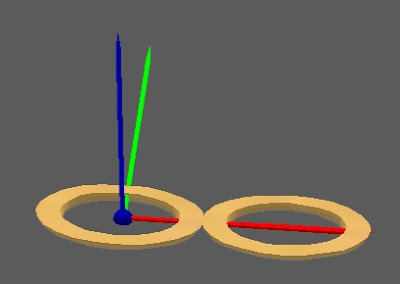
 (for this link, notice that the blue dot is in the precise center, and that ALL 3 toothpicks pierce the link in the center positions as well)
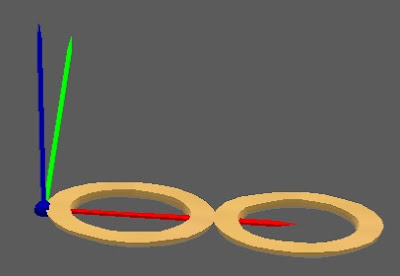
6) SHIFT-CLICK-DRAG on the RED axis arrow head to create a copy of the link, and move it PRECISELY down the RED toothpick axis until the 2 links are JUST touching (or overlapping, if you want interdigitated links)
- this defines the LENGTH of the link, so LinkRez will know how apart the links need to be separated
- length is reported in MILLIMETERS (not meters), so that you can more easily edit it by hand in notecard programs
- do NOT rotate your copied link
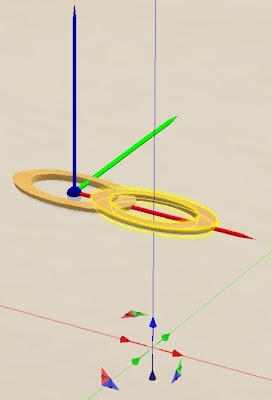 (in this case, because I want the links to "overlap" as a chain link, I've dragged the copy so that it still overlaps. Normally, you'd want to drag it so that the links were just barely touching)
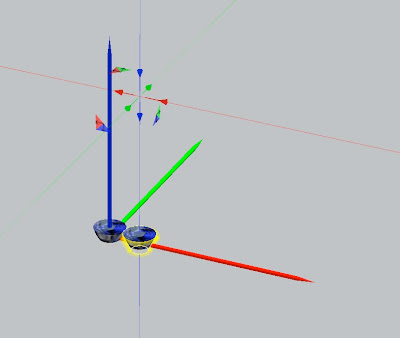 (here's an example of tiny 1.8 millimeter link; it's positioned to be just a little bit "up" on the blue axis, to have the gems protrude outwards a little bit on a necklace, and just touching, so they will be size to not overlap and not have gaps)
7) TOUCH the sizing board button labeled "CENTER", and it will detect the pair of links, and CHAT the length and offsets. For this lesson, DO NOT use the button labeled "EDGE" -- the use of that button will be described in Lesson 6b.
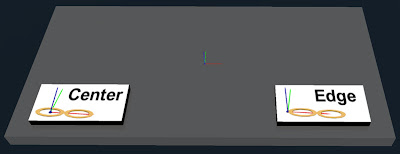
- go into your chat history and copy the line NAME~LENGTH~rotOffset~posOffset
- I'd recommend immediately pasting this into the description field of your link, so that you'll always have easy access to the information
- note that to use this information for LinkRez, it will need to be preceeded with the word "LINK", either in chat commands or notecard programs
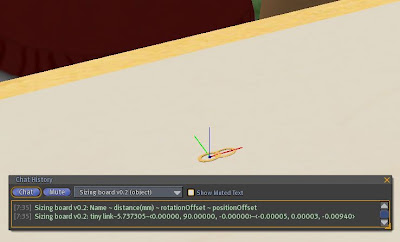 (in the chat history, you would want to copy and save that second line, with all the scary numbers, starting from the word "tiny link")
OK, enough of the tedious stuff. Now, you are FINALLY ready to USE your fancy link to create a necklace! Up till now, you've been using the "/1 TEST" command, which uses an included Temp-On-Rez prim, with the Sizing board calculations already known to LinkRez.
Using the LINK command to specify the LINK you want to use
First, LinkRez needs to be able to access your newly sized link, so drag a copy of your link from your inventory and into the LinkRez Object contents (the transparent disk, which also contains a number of other items, including the LinkRez script, LinkRezRoot, LinkRezStand, and LinkRezTestLink).
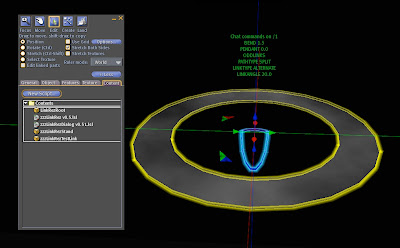
Copy the Sizing Board information out of the Description field (you did save it there, right?), and issue the appropriate "/1 LINK" command.
From the example above, it would look something like:
- /1 LINK tiny link~5.737305~<0.00000,>~<-0.00005, 0.00003, -0.00940>
- obviously, you would want to be using copy and paste...
Now would be a good time to build up a nice collection of saved links, each with Sizing Board information in the Description fields.
Practice sizing links, making necklaces / bracelets / rings made up of single types of links. And, when you have a couple of links ready, you can go on ahead to the next lesson, where you'll use a notecard program to generate necklaces with MULTIPLE types of links!
Lesson 6b: Sizing Board: "CENTER" and "EDGE" options (new to LinkRez v1.01)
In the above lesson, you were asked to align the link so that it was perfectly centered with the blue dot, as above, and then to touch the button labeled CENTER, and NOT the button labeled EDGE.
Although this works well for the majority of links, sometimes it can be difficult to precisely "eyeball" the blue dot to be in the precise center. For that reason, another Sizing Board option is available, using the "EDGE" button. Both the "CENTER" and "EDGE" alignment methods, if used properly, will yield the exact same results, but sometimes one method will be easier than the other.
With this link, if you wanted to use the "EDGE" method, just like before, you would still:
- rez and rotate the link so that it is lying perfectly flat against the grey sizing board
- the red toothpick axis would still point "forward" down the necklace link
- BUT, this time, instead of "centering" the blue dot / toothpick, you would line up the EDGE of the link with the blue toothpick
- same as before, you would then shift-drag down the red axis so that the links were perfectly touching
- finally, you would "touch" the EDGE button, instead of the CENTER button
Lesson 7: necklaces with different links: using notecard programs
The "/1 TEMP" and "/1 LINK" commands create necklaces that use only one type of link, repeated through the necklace. These necklaces also have only one LINKTYPE and LINKANGLE.
But using LinkRez Notecard Programs, you can create necklaces with as many different types of LINKs, LINKTYPEs, and LINKANGLEs as you wish. Furthermore, you can load in previously saved necklace sizes and parameters. It makes for a very powerful tool to make very complex necklaces.
LinkRez Notecard Programs are actually very simple. Let's start with the basics:
- notecard programs are put into the LinkRez clear disk contents, the same as the links
- "/1 RUN name" will run the notecard program called "name"
- the notecard will contain one command per line
- all relevant chat commands are supported
- the necklace will be rezzed from the front, when a LINK command (just like the chat command) is encountered
- each LINK command will rez only one link (instead of an entire necklace)
- when the end of the notecard is reached, the last LINK rezzed will be used to complete the necklace
Here's an example of the simplest possible notecard program, containing only a single line:
- LINK tiny link~5.737305~<0.0,>~<-0.00005, 0.00003, -0.00940>
- this notecard program would be the equivalent of chatting that LINK command
Here's a more interesting multi-line notecard program. Imagine a notecard named "fancy necklace" containing the following lines:
- ODDLINKS
PENDANT 0.3
LINKTYPE FLAT
LINK fancy pendant~20~<0,0,0>~<0,0,0>
LINK giant diamond~10~<0,0,0>~<0,0,0>
LINKTYPE ALTERNATE
LINKANGLE 20
LINK tiny link~5.737305~<0.0,>~<-0.00005, 0.00003, -0.00940> - so, after issuing a "/1 RUN fancy necklace" command, what does this program do? LinkRez reads each line in order
- ODDLINKS: sets up to rez only ONE front center link
- PENDANT 0.3: the necklace will have a little bit of a pendant "point" to it
- LINKTYPE FLAT: the subsequent LINKs to be rezzed will lie flat against the body
- LINK fancy pendant...: the LINK command tells LinkRez to rez a link, but since we have ODDLINKS active, only ONE "fancy pendant" will be rezzed, front and center, flat against the body
- LINK giant diamond...: the LINK command will now rez ONE left and right PAIR of "giant diamond", also flat against the body
- LINKTYPE ALTERNATE and LINKANGLE 20: set up so that subsequent rezzed LINKs will alternate back and forth by 20 degrees, to form a nice chainlink effect
- LINK tiny link...: rez ONE left and right pair of "tiny link", offset by 20 degrees from "flat"
- now, the end of the notecard has been reached; LinkRez will use the last rezzed LINK ("tiny link") at the last known settings "LINKTYPE ALTERNATE" and "LINKANGLE 20" to finish the entire necklace
- the final result will be a necklace with a single central "fancy pendant," flanked by a pair of "giant diamond,"and completed with an alternating chain link of "tiny link"
- notice that blank lines are ignored, which can help break up a long notecard program into understandable chunks
- also be aware that anything after a "/" character (inclusive) on a notecard line will be ignored, which can allow you to put comments into a notecard program
- do NOT use the "/" or "~" character in link names, because these characters specify comments and delimiters respectively
Notecard programs can include commands that change the shape, size, and angle of the guide ellipses, using the GUIDE command
- each time you ran a "/1 TEST" or "/1 LINK", LinkRez chats the ellipse GUIDE parameters
- this line can be copied and pasted into a notecard program, to set the GUIDE ellipse sizes and angles
- combined with the BEND and PENDANT parameters, the complete shape of the necklace is determined, and can be loaded from notecard programs
- if you have a notecard program with no LINK commands, no LINKs will be rezzed
- this can be handy to have notecard programs that simply store necklace shapes, but no necklace link information, so you can easily reconfigure the LinkRez Object to be ready to run an actual LINK containing
- for example, you might have saved necklace shapes in the notecards "Ged," "Sierra," and "Eleanora," along with the previous necklace program "fancy necklace"
- then, you could issue:
"/1 RUN Ged" + "/1 RUN fancy necklace"; wait for necklace to rez, then
"/1 RUN Sierra" + "/1 RUN fancy necklace"; wait for necklace to rez, then
"/1 RUN Eleanora" + "/1 RUN fancy necklace"
... and you would have 3 "fancy necklace"s, but each fitted to a different individual
Lesson 8: more powerful notecard programs, repeating sets of links
In the previous lesson, you created a moderately complex notecard program using 3 different types of links. In this lesson the REPEAT ## and REPEATUNTIL ## commands will be introduced, which allow you to repeat any set of links either a specific number of times, or until a specific position on the necklace.
For example, what if you wanted 30 "small links," followed by completing the necklace with as many "tiny links" as needed?
You COULD do it by pasting the "LINK small link~##~##~##" line 30 times, and then the "tiny link" line, but that's inelegant. Instead, you can use the REPEAT command:
- REPEAT ##
...
...
ENDREPEAT - repeats all the commands between REPEAT ## and ENDREPEAT, a total of ## times
- REPEAT 30
LINK small link~##~##~##
ENDREPEAT
LINK tiny link~##~##~##
But, what if you wanted to use "small link" just to the exact left and right "sides" of a necklace, regardless of how many links that took (which will be different, depending on the circumference of the necklace), and THEN switch to "tiny link"? The REPEATUNTIL command allows you to repeat a set of links until a particular PLACE around the necklace.
- REPEATUNTIL ##
...
...
ENDREPEAT - repeats all the commands between REPEATUNTIL and ENDREPEAT, until the links have been rezzed to ## DEGREES
- 0 degrees is the front of the necklace; 90 degrees is the side; 180 degrees is the back
- any intermediate value can be used as well
- REPEATUNTIL 90
LINK small link~##~##~##
ENDREPEAT
LINK tiny link~##~##~##
Note that you can combine as many REPEAT loops, REPEATUNTIL loops, different sets of LINKs, LINKTYPEs, and LINKANGLEs, as you wish, to construct necklaces as complex as you want.
And then, using saved necklace "GUIDE" and "BEND"-containing notecards, you can make these complex necklaces precisely fit as many different individual avatars as you like.
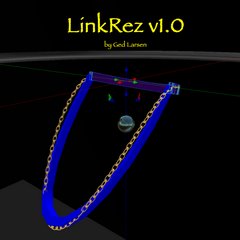
Here's an example of a necklace created by a necklace program notecard, using 3 different links:
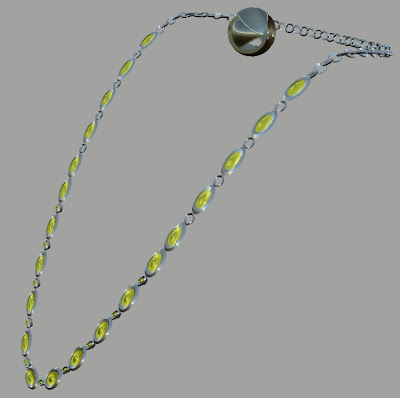 Here, the necklace program consists of something like:
- ODDLINKS
LINKTYPE FLAT
LINK large oval~##~<#,#,#>~<#,#,#>
REPEAT 5
LINK small oval~##~<#,#,#>~<#,#,#>
LINK large oval~##~<#,#,#>~<#,#,#>
END REPEAT
REPEATUNTIL 80
LINK large oval~##~<#,#,#>~<#,#,#>
LINK metal ring~5~<#,#,#>~<#,#,#>
ENDREPEAT
LINKTYPE ALTERNATE
LINKANGLE 20
LINK metal ring~3~<#,#,#>~<#,#,#>
- starting with a CENTER large oval link (so the total # of links will be ODD in this necklace)
- then, repeating a small oval + large oval set five times
- then, repeating a large oval + metal ring four times (to "80 degrees")
the above links were all placed "flat" to the body - finally, using just metal rings, but alternating the angle + and - 20 degrees from "flat" against the body
- the "length" of the metal rings was decreased from what was used in the previous segment, so that they would intersect, while the earlier segment, they touched edge-to-edge
Lesson 8b: More convenient access to LinkRez Notecard Programs (new to LinkRez v1.01)
Because Notecard Programs are so fundamental to getting the most out of LinkRez, in version 1.01, based on a suggestion from a LinkRez user, I added a much more convenient way to access your notecard programs. Simply TOUCH the LinkRez Object, and a dialog menu will come up showing an alphabetical list of ALL notecards present in your LinkRez Object. Selecting any button will run that notecard program.
One very powerful way to use this feature might be to:
- have a whole bunch of notecard programs specifying ONLY the GUIDE, PENDANT, and BEND command lines, which would specify the SHAPE and SIZE of a necklace. Don't include ANY specific link information. For example, these might specify a male and female sizes of choker necklaces, long loopy necklaces, bracelets, and even rings.
- have another set of notecard programs specify actual LINKS, LINKTYPEs, LINKANGLEs, and REPEAT commands, but WITHOUT sizing information
As you collect more and more links and notecard programs, you'll find that you can VERY quickly create entire collections of jewelry, sized for specific avatars.
Conclusion
I hope you have as much fun designing and creating with the assistance of LinkRez, as I had scripting it. Feedback would be welcome! Please post comments on the blog, or IM / notecard me in-world to "Ged Larsen," or email me at ged (dot) larsen (at) gmail (dot) com.
Even better, please drop me pictures of your creations, and let me know if I might be allowed to post them here, and whether you'd like to be attributed. I have very little skill (OK, let's be honest, NO skill) in creating and building myself, so I especially appreciate being able to see what my scripts have helped contribute to. It's very gratifying to me.
Regards!
Ged Larsen
